
Introduction
How to cut a mullet is one of the most searched haircut topics because the mullet has made a huge comeback in recent years. Once known as a classic hairstyle from past decades, the modern mullet now appears on celebrities, athletes, musicians, and everyday people around the world. It combines shorter hair on the top and sides with longer hair at the back, creating a bold and stylish appearance.
Learning how to cut a mullet requires patience, proper tools, and a clear cutting plan. Whether you are cutting your own hair, helping a friend, or beginning your journey as a barber, understanding the basics will help you achieve better results. A great mullet is not just about leaving the back long. It is about balancing the top, blending the sides, and shaping the back to suit the person’s face and hair type.
Modern mullets come in many different styles. Some people prefer a soft and textured look, while others choose sharp fades with dramatic length in the back. Because there are so many variations, knowing the right techniques allows you to customize the haircut for different preferences.
In this complete guide, you will learn everything from preparation and tools to detailed cutting techniques. By following each step carefully, you can create a mullet that looks clean, balanced, and professional.
Quick Facts About How to Cut a Mullet
| Feature | Details |
|---|---|
| Haircut Name | Mullet |
| Difficulty Level | Moderate |
| Best Hair Types | Straight, wavy, curly, thick |
| Average Cutting Time | 30–60 minutes |
| Main Tools | Clippers, scissors, comb, clips |
| Maintenance | Every 3–6 weeks |
| Suitable For | Men, women, teenagers |
| Popular Styles | Modern, taper, fade, shag, curly mullet |
| Skill Needed | Basic to intermediate haircutting |
What Is a Mullet Haircut?
A mullet is a hairstyle that features shorter hair on the front and sides while leaving noticeable length at the back. Although this description sounds simple, today’s mullets come in many creative versions that range from subtle to dramatic.
The classic mullet became famous decades ago, but today’s styles are much more refined. Modern barbers blend the haircut smoothly, add texture, and customize the shape based on face structure and hair type.
The main sections of a mullet include:
- Shorter top
- Trimmed or faded sides
- Longer back
- Natural or textured transition
- Personalized fringe or bangs
Unlike many hairstyles that require the same length throughout, the mullet intentionally creates contrast. This difference in length gives the haircut its unique personality.
Many people choose a mullet because it works well with:
- Straight hair
- Wavy hair
- Curly hair
- Thick hair
- Medium-density hair
Even fine hair can work with the right styling techniques.
Key Features of a Modern Mullet
Modern mullets usually include:
- Textured layers
- Cleaner blending
- Soft transitions
- Personalized neckline
- Natural movement
These improvements make today’s mullet much easier to wear than older versions.
Why the Mullet Is Popular Again
The mullet has become one of the biggest hairstyle trends in recent years. Fashion often brings back classic styles, and the mullet has returned with a modern twist that appeals to younger generations as well as people who remember the original trend.
Social media has played a major role in bringing attention to this haircut. Hairstylists regularly share transformation videos that show dramatic mullet makeovers, inspiring viewers to try the style themselves.
Several reasons explain why the mullet has become so popular again.
It Looks Unique
Many haircuts can appear similar, but a mullet stands out. It gives people an opportunity to express their personality without requiring complicated daily styling.
It Works With Many Hair Types
Whether hair is curly, straight, thick, or wavy, there is a version of the mullet that suits it. This versatility makes it accessible to many people.
It Is Highly Customizable
No two mullets need to look the same. A barber can adjust:
- Back length
- Side fade
- Fringe
- Layers
- Texture
- Overall shape
This flexibility allows each haircut to feel personal.
Low Daily Maintenance
Although regular trims keep the shape looking fresh, daily styling is often simple. Many people only need:
- Texture spray
- Matte clay
- Styling cream
- Sea salt spray
These products help create natural movement without much effort.
Celebrity Influence
Many musicians, actors, athletes, and online creators have adopted modern mullets, encouraging fans to experiment with the haircut themselves.
Tools You Need Before You Cut a Mullet
Having the proper equipment makes cutting easier and produces cleaner results. Professional-quality tools also reduce mistakes caused by uneven cutting.
Here are the essential tools.
Hair Cutting Scissors
Professional haircutting scissors produce smooth, accurate cuts. Household scissors are usually too dull and may damage the hair.
Look for scissors that are:
- Sharp
- Comfortable
- Lightweight
- Stainless steel
Clippers
Clippers help create clean sides and faded areas.
Useful clipper guards include:
- Guard 1
- Guard 2
- Guard 3
- Guard 4
These sizes allow gradual blending.
Detail Trimmer
A detail trimmer cleans:
- Sideburns
- Neckline
- Around ears
- Hairline
This creates a polished finish.
Comb
A cutting comb helps maintain even sections while cutting.
Choose one with:
- Fine teeth
- Wide teeth
- Comfortable grip
Hair Clips
Hair clips keep sections separated while working.
They make it much easier to control:
- Crown
- Top
- Fringe
- Back
Spray Bottle
Slightly damp hair is easier to section and cut accurately.
A spray bottle keeps hair evenly moist throughout the haircut.
Mirror
If cutting your own hair, use:
- One front mirror
- One handheld mirror
This helps you see the back.
Cape or Towel
A cape or towel keeps loose hair away from clothing and makes cleanup easier.
Blow Dryer
After cutting, a blow dryer helps reveal the final shape before making small adjustments.
Styling Products
Useful finishing products include:
- Matte paste
- Hair wax
- Texture powder
- Sea salt spray
- Light hairspray
These help highlight the layers of the mullet.
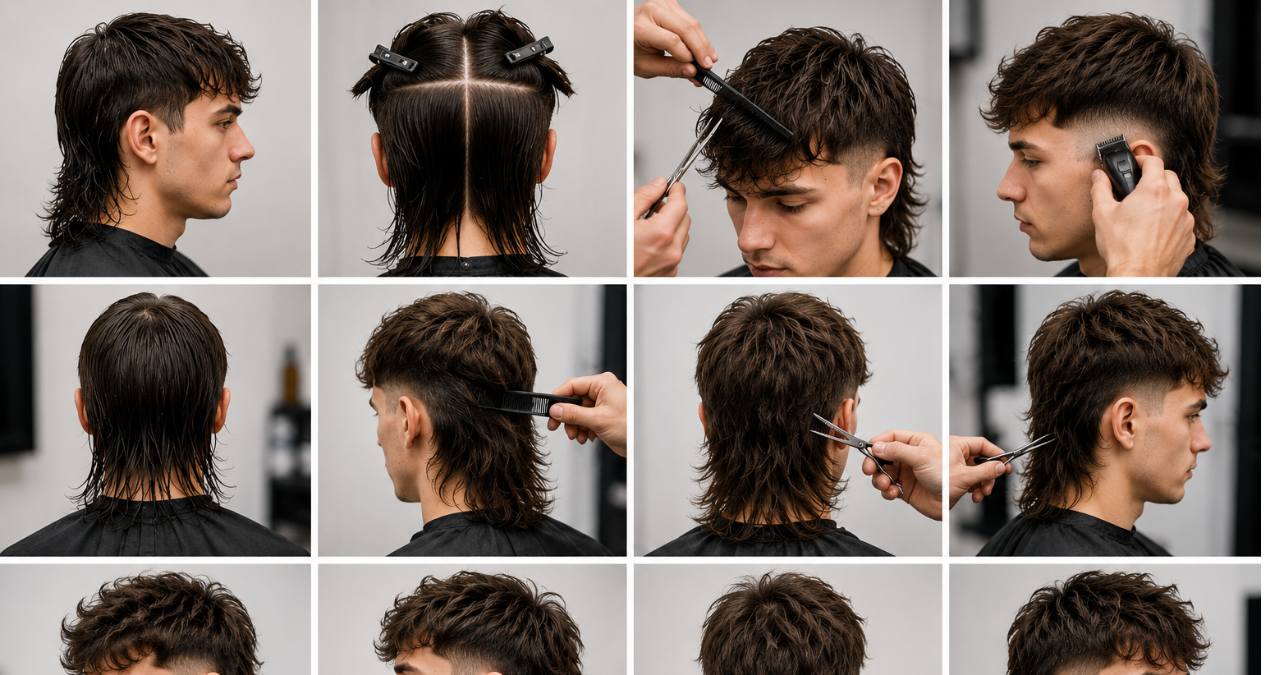
How to Prepare Hair Before Cutting
Preparation is one of the most important parts of learning how to cut a mullet. Skipping preparation often leads to uneven sections and inconsistent lengths.
Professional barbers spend several minutes preparing before making the first cut.
Wash the Hair
Begin with freshly washed hair.
Clean hair:
- Shows natural texture
- Removes oil buildup
- Allows cleaner sectioning
- Produces more accurate cutting
Avoid heavy conditioners that make hair slippery.
Dry Until Slightly Damp
Hair should not be soaking wet.
Slightly damp hair provides better control while still allowing natural movement.
Remove Tangles
Brush or comb through every section carefully.
Knots can cause uneven cutting because they pull the hair into different lengths.
Study Natural Growth
Before cutting, observe:
- Crown direction
- Hairline
- Cowlicks
- Thick areas
- Thin areas
These growth patterns influence how the finished mullet will sit.
Decide on the Final Style
Before picking up scissors, know exactly what kind of mullet you want.
Questions to ask include:
- Should the sides be faded?
- How long should the back remain?
- Should the fringe stay long?
- Will the top have texture?
- Is the style subtle or dramatic?
Having a clear plan prevents unnecessary corrections later.
Divide Hair Into Sections
Professional sectioning improves accuracy.
Typical sections include:
- Front
- Crown
- Left side
- Right side
- Back
Secure each section using clips.
This keeps the haircut organized from beginning to end.
Check Symmetry
Stand behind the client or use mirrors to confirm both sides are evenly sectioned.
Small errors at this stage become much larger once cutting begins.
How to Cut a Mullet Step by Step (Beginning)
Now that the preparation is complete, it is time to begin cutting. The first steps establish the foundation of the haircut, so take your time and work carefully.
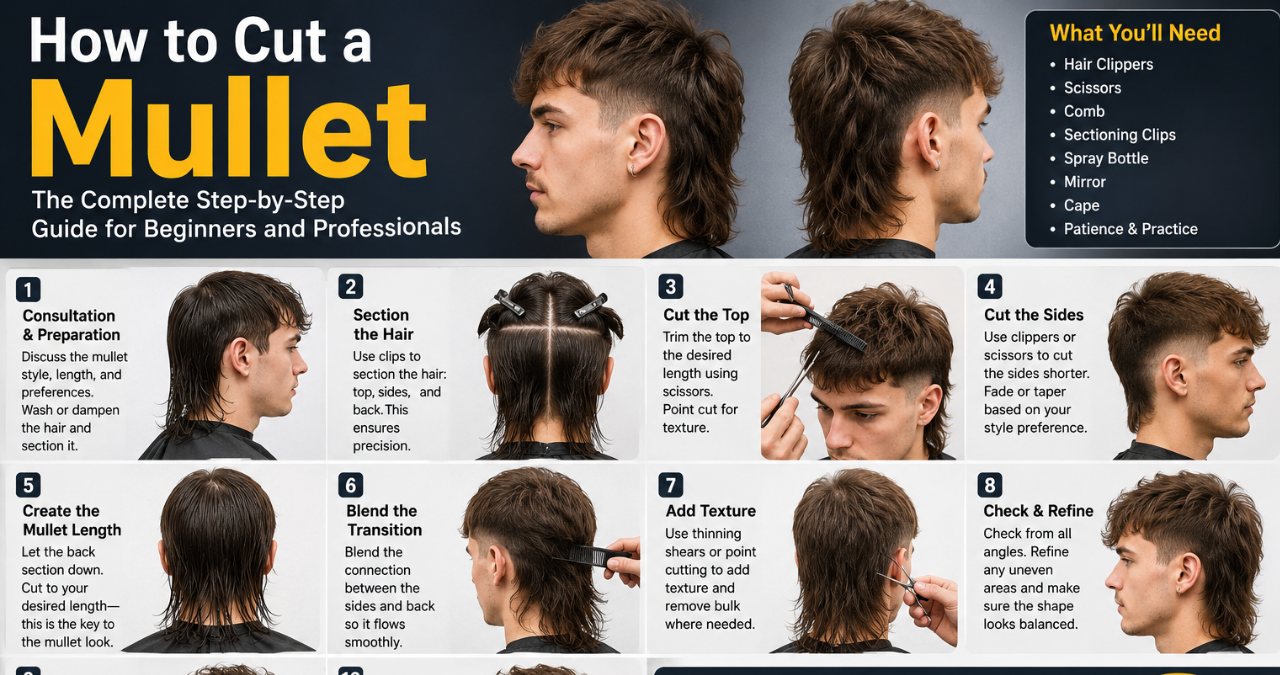
Step 1: Create Your Guide Length
Start at the top of the head. Choose the desired length for the crown and cut a small guide section.
This guide becomes the reference point for every other section on the top.
Work slowly and compare each new section to the guide before cutting.
Avoid cutting large sections at once, as smaller sections provide better control and improve accuracy.
Step 2: Cut the Top Evenly
Using the guide length, continue trimming the top from front to crown. Lift each section consistently to maintain an even shape while leaving enough length to add texture later if desired. The top should blend naturally toward the back without removing too much length, since the longer rear section is the defining feature of the mullet.
Step 3: Blend the Crown Into the Back
After finishing the top, move toward the crown. This is where the shorter top begins to transition into the longer back section.
Work with small sections of hair and use the guide you created earlier. Instead of removing too much length, softly blend the crown so the change between the top and back looks natural. The back should remain noticeably longer because that is the signature feature of the mullet.
If you want a dramatic mullet, leave more length in the back. For a modern and subtle version, blend the transition more smoothly.
Step 4: Trim the Sides
The sides help define the overall shape of the haircut.
There are several ways to cut them:
- Keep them short with scissors.
- Create a low taper.
- Add a mid fade.
- Use a high fade for extra contrast.
Start with a longer clipper guard if using clippers. You can always remove more hair later, but you cannot put it back.
Compare both sides often to keep them even.
Step 5: Shape Around the Ears
Carefully trim the hair around each ear.
Use a detail trimmer or scissors to create clean lines without cutting too high. This small detail makes the haircut appear much more professional.
Always compare the left and right sides before moving on.
Step 6: Leave the Back Longer
The back is the most recognizable part of a mullet.
Comb the back hair straight down and decide how much length you want to keep.
Some people prefer:
- Just below the neckline
- Shoulder length
- Medium length
- Soft layered length
Trim only the ends first. You can always shorten them later if necessary.
Step 7: Add Layers
Layers create movement and prevent the haircut from looking heavy.
Using scissors, point cut into the ends instead of cutting straight across.
Layering helps:
- Reduce bulk
- Add texture
- Improve styling
- Create natural movement
Take your time during this step because good layering makes the haircut look modern rather than outdated.
Step 8: Texture the Top
Modern mullets usually have textured tops.
Point cutting is one of the easiest techniques for adding texture.
Instead of making blunt cuts, lightly snip into the ends of the hair.
This creates:
- Softer edges
- Better movement
- Easier styling
- More natural volume
Avoid removing too much hair in one area.
Step 9: Blend Everything Together
Now check the entire haircut.
Look for:
- Heavy lines
- Uneven sections
- Bulky spots
- Sudden changes in length
Use scissors to soften these areas until the haircut flows naturally.
Walk around the client instead of checking from only one angle.
Step 10: Clean the Neckline
Use your trimmer to tidy the neckline.
Choose either:
- Natural neckline
- Rounded neckline
- Slightly tapered neckline
Avoid cutting the neckline too high because it shortens the appearance of the mullet.
Step 11: Dry and Inspect
Blow dry the hair completely.
Dry hair reveals the true shape of the haircut.
Check from every direction:
- Front
- Back
- Left
- Right
- Top
Trim any small areas that appear uneven after drying.
Common Mistakes to Avoid
Even experienced beginners make mistakes while learning how to cut a mullet. Knowing these common errors can help you achieve better results.
Cutting the Back Too Short
The longer back creates the mullet’s identity.
If you remove too much length, the haircut may simply look like a regular short hairstyle.
Removing Too Much Hair at Once
Take off small amounts of hair.
It is much easier to shorten hair gradually than to fix an overly short section.
Ignoring Hair Growth Patterns
Cowlicks and natural growth directions affect how the haircut sits.
Always cut with the hair’s natural movement instead of fighting against it.
Uneven Sides
Frequently compare both sides throughout the haircut.
Standing directly behind the client helps you notice uneven lengths early.
Skipping Sectioning
Trying to cut without organized sections often causes inconsistent results.
Always clip hair into manageable parts before cutting.
Overusing Clippers
Scissors provide more control for blending and layering.
Use clippers mainly for fades and shorter side sections.
Forgetting Final Checks
Always inspect the haircut after blow drying.
Small imperfections become much easier to notice on dry hair.
Styling Tips
Learning how to cut a mullet is only part of the process. Styling brings the haircut to life.
Use Matte Clay
Matte clay creates texture without making the hair appear greasy.
Work a small amount through the top using your fingers.
Try Sea Salt Spray
Sea salt spray adds natural volume and movement.
It works especially well on:
- Wavy hair
- Fine hair
- Medium-length mullets
Blow Dry for Volume
Use a blow dryer while lifting the roots with your fingers.
This creates a fuller appearance without requiring heavy styling products.
Rub a little styling paste between your hands.
Define the Layers
Apply it mainly to:
- Crown
- Fringe
- Top layers
This helps emphasize texture.
Avoid Heavy Products
Too much gel or oil can flatten the haircut.
Choose lightweight products that allow natural movement.
Best Mullet Variations
One of the reasons people enjoy learning how to cut a mullet is the wide variety of styles available.
Modern Mullet
The modern mullet features:
- Soft blending
- Textured top
- Clean sides
- Medium back length
This is the most popular version today.
Fade Mullet
A fade mullet combines:
- Skin fade
- Taper fade
- Longer back
- Textured crown
It creates a sharp and contemporary appearance.
Curly Mullet
Natural curls add impressive volume and personality.
The curls provide texture while the longer back enhances movement.
Shag Mullet
This version combines a shag haircut with a mullet.
Features include:
- Heavy layers
- Feathered texture
- Relaxed appearance
- Natural flow
Wolf Cut Mullet
The wolf cut blends shaggy layers with mullet characteristics.
It usually includes:
- Thick texture
- Volume
- Curtain bangs
- Soft transitions
This style remains especially popular among younger adults.
Classic Mullet
The traditional version has:
- Short top
- Short sides
- Long back
It stays true to the haircut’s original design.
Hair Care After Cutting
Proper maintenance keeps the haircut looking fresh.
Schedule Regular Trims
Trim every 3–6 weeks to maintain the shape.
Small trims prevent the haircut from becoming uneven.
Use a Quality Shampoo
Choose a shampoo designed for your hair type.
Healthy hair makes styling much easier.
Condition Regularly
Conditioner keeps longer back sections soft and manageable.
Apply mainly to the middle and ends of the hair.
Protect Against Heat
If you frequently use a blow dryer, apply a heat protectant beforehand.
This helps reduce dryness and breakage.
Avoid Excessive Washing
Washing every day may remove natural oils.
Many people find that washing a few times each week helps maintain healthier-looking hair, though the ideal routine depends on individual hair type and lifestyle.
Brush Gently
Use a wide-tooth comb or soft brush.
This helps reduce unnecessary breakage, especially in the longer back section.
Frequently Asked Questions
Is a mullet difficult to cut?
It is considered a moderate-level haircut. With patience, proper tools, and careful sectioning, beginners can learn the basics successfully.
Can beginners learn how to cut a mullet?
Yes. Start with a simple modern mullet before attempting advanced fades or highly textured styles.
Which hair type works best?
Straight, wavy, curly, and thick hair can all suit a mullet when the cut is adjusted to match the hair’s natural texture.
How often should a mullet be trimmed?
Most people benefit from a trim every three to six weeks to maintain the overall shape.
Can I cut my own mullet?
Yes, although using two mirrors and taking your time is essential. Having another person help with the back often produces better results.
Do mullets require daily styling?
Not necessarily. Many modern mullets look great with only a small amount of styling cream or texture spray.
What face shapes suit a mullet?
Oval, square, heart-shaped, and many round faces can wear a mullet successfully when the proportions are customized.
Are mullets still fashionable?
Yes. The modern mullet continues to be one of the most popular hairstyles because it combines classic character with contemporary styling techniques.
Conclusion
Learning how to cut a mullet takes practice, attention to detail, and the right tools, but the results can be rewarding. From careful preparation and accurate sectioning to blending, layering, and styling, every step contributes to a balanced haircut that reflects the wearer’s personal style. Whether you prefer a classic mullet, a modern textured version, or a bold fade variation, mastering the fundamentals allows you to create a clean and confident look. With regular maintenance, proper hair care, and a little styling, a well-cut mullet can remain fresh, versatile, and easy to wear. The more you practice how to cut a mullet, the more confident and precise your haircutting skills will become.
Helpful Tip: Before making your first cut, save a few reference photos of the mullet style you want to achieve. Comparing your progress with a visual guide throughout the haircut can make it easier to maintain balanced proportions and achieve a polished final result.
Stay in touch to get more updates & news on See Blog Hub!